Alternative version with cooler colour:
PSD File Download
OK Let’s get started!
To complete this tutorial, you will need the following stocks:
Step 1
Create a new document with 1200px * 700px with black background. Let’s start by preparing the background – load the paper texture image into Photoshop, select a piece of it as shown below:
Copy and paste the selection onto our canvas (resize to fit if necessary), add the following 2 adjustment layers on top of it:
Black and White
Levels
Use a soft eraser (set opacity and flow to be 40%) to remove some parts of the paper texture, you will have the following effect:

Step 2
We will add some metal texture onto the background – load the metal texture into Photoshop, select a piece as shown below:
Copy and paste the selection onto our canvas, then change the blending mode to “overlay”, you will have the following effect:
Add the following 3 adjustment layer as clipping mask to this metal texture layer:
Black and White
Levels

Curves

and here is the effect so far:

Step 3
We will start making the text effect – load the font and type some texts onto our canvas:
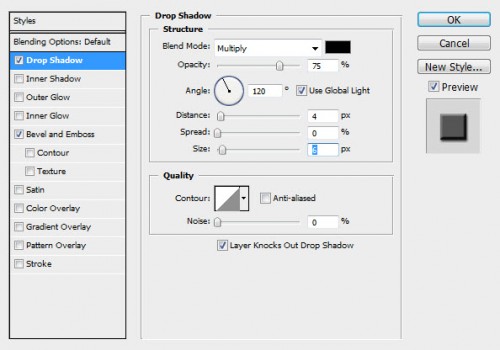
Apply the following layer blending mode to the text layer:
Drop shadow
Bevel and Emboss
Then add a layer mask to the text layer, erase the lower part of the text with a soft brush:

Then paint some shadow under the text with a black soft brush to add some depth:

Step 4
Now we will add the metal texture onto the text – go back to the metal texture and select a piece with the text layer selection:
Copy and paste the selection onto the text, you will have the following effect:
Add the following 2 adjustment layers as clipping mask to this text metal layer:
Black and White
Curves
Then, go back to the text metal texture layer, use a soft eraser to remove some part of the texture, as shown below:
Hint: make sure you set the eraser flow and opacity to be around 20%, and gently erase the texture. This will add variety and depth for the text.
Step 5
We will add some fire texture onto the text. Load the fire image into Photoshop, and use a 30px feather lasso tool to select a piece:
Copy and paste the selection on a layer below the text layer, so it appears behind the text:
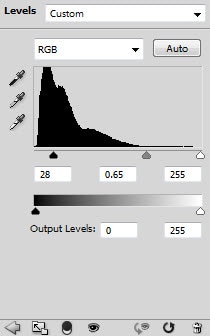
Hit Ctrl + L to bring up the levels adjustment tool, apply the following setting:
Change the blending mode of this fire texture layer to “Screen”, you will have the following effect:
Duplicate this fire layer a few times, resize and rotate them, scatter them around the text:
Step 6
We’re almost done! To add some more details, I flatten the image and applied some “Reduce Noise” filter effect as shown below:
Add a new layer and use a soft white brush with around 40% flow and opacity, paint some highlights for the text:
Add a curves adjustment layer on top with the following settings to bring out more contrast:
I then further added some colour and light adjustments and here is the final effect I have: (click to enlarge)
Alternative version with cooler colour:
That’s it for this tutorial! Hope you enjoy it and find it useful!
Till next time, have a great day!


0 comments:
Post a Comment